Basic Usage
UI Module usage guide.
Before You Begin
Before starting this guide, complete Getting Started. Calling PetnowUiClient.initialize() and configureDetection() is required.
This guide provides step-by-step instructions on how to integrate pet nose print and face capture functionality into your app using PetnowCameraFragment, the core of the PetnowUI module.
Create Camera Screen
Inherit Fragment and set up the Detection listener.
Display Camera Screen
Pass captureSessionId and display the Fragment on screen.
Handle Capture Results
Process success/failure callbacks.
Error Handling
Handle permission and initialization errors correctly.
Additional Features
Use progress/status observation, camera switching, and resume detection.
Step 1: Create Camera Screen
Create a camera screen by inheriting PetnowCameraFragment.
import android.os.Bundle
import io.petnow.ui.PetnowCameraFragment
import io.petnow.ui.PetnowCameraDetectionListener
import java.util.UUID

class ClientCameraFragment : PetnowCameraFragment(), PetnowCameraDetectionListener {

  companion object {
    fun newInstance(captureSessionId: UUID) = ClientCameraFragment().apply {
      arguments = Bundle().apply {
        putString(ARG_CAPTURE_SESSION_ID, captureSessionId.toString())
      }
    }
  }

  override fun provideCustomOverlayLayout(): Int? = null

  override fun onAttach(context: Context) {
      super.onAttach(context)
      setPetnowCameraDetectionListener(this)
  }

  // Implement in Step 3
  override fun onDetectionFinished(result: DetectionCaptureResult) { }

  // Implement in Step 5
  override fun onDetectionProgress(progress: Int) { }
  override fun onDetectionStatus(primaryDetectionStatus: PetnowDetectionStatus) { }
}
Understanding Parameters
| Element | Description |
|---|---|
PetnowCameraFragment | Base Fragment providing camera preview and detection logic |
PetnowCameraDetectionListener | Detection result, progress, and status callback interface |
ARG_CAPTURE_SESSION_ID | Key for passing the server-issued capture session ID |
provideCustomOverlayLayout() | Custom overlay layout resource ID (null if none) |
Step 2: Display Camera Screen
captureSessionId Required
PetnowCameraFragment must receive captureSessionId as arguments. Pass the captureSessionId obtained from your server in Getting Started.
After creating a capture session from the server, display the Fragment on screen.
// Using ClientCameraFragment from Activity or another Fragment
val captureSessionId: UUID = // captureSessionId received from server

val fragment = ClientCameraFragment.newInstance(captureSessionId)
supportFragmentManager.beginTransaction()
    .replace(R.id.fragment_container, fragment)
    .commit()
Once the Fragment is attached, it internally initializes the camera and starts detection. Only the basic Tracking UI is displayed.
Step 3: Handle Capture Results
When detection completes, the onDetectionFinished callback is called.
override fun onDetectionFinished(result: DetectionCaptureResult) {
    when (result) {
        is DetectionCaptureResult.Success -> {
            val (noseImages, faceImages) = result
            // Upload to server or navigate to next screen
            uploadImages(noseImages, faceImages)
        }
        is DetectionCaptureResult.Fail -> {
            // Detection failed — retry or close the session
            showRetryOrExitDialog()
        }
    }
}
DetectionCaptureResult Type
sealed class DetectionCaptureResult {
    data class Success(
        val noseImageFiles: List<File>,
        val faceImageFiles: List<File>
    ) : DetectionCaptureResult()

    data object Fail : DetectionCaptureResult()
}
Handling Failure (Fail)
DetectionCaptureResult.Fail is delivered when insufficient images were captured within the allotted time (e.g., the pet left the frame, poor lighting conditions).
Server Session Management on Failure
When you receive Fail, the server capture session is still open.
- Retry: Call
resumeDetection()to restart capture within the same session - Close: Navigate away from the camera screen
If you close without retrying, the session may appear as "processing" in Petify Console. The server automatically terminates the session (ABORTED) after approximately 5 minutes.
is DetectionCaptureResult.Fail -> {
    AlertDialog.Builder(requireContext())
        .setTitle("Capture Failed")
        .setMessage("Could not capture enough nose print images. Would you like to try again?")
        .setPositiveButton("Retry") { _, _ ->
            resumeDetection()
                .onSuccess { /* Detection restarted */ }
                .onFailure { e -> navigateBack() }
        }
        .setNegativeButton("Cancel") { _, _ ->
            navigateBack()
        }
        .show()
}
Step 4: Error Handling
Camera usage requires runtime permissions. Check permissions before displaying the Fragment.
private val cameraPermissionLauncher = registerForActivityResult(
    ActivityResultContracts.RequestPermission()
) { isGranted ->
    if (isGranted) {
        showCameraFragment()
    } else {
        // Guide user to settings on permission denial
        showPermissionDeniedDialog()
    }
}

private fun checkAndLaunchCamera() {
    when {
        ContextCompat.checkSelfPermission(
            this, Manifest.permission.CAMERA
        ) == PackageManager.PERMISSION_GRANTED -> {
            showCameraFragment()
        }
        else -> {
            cameraPermissionLauncher.launch(Manifest.permission.CAMERA)
        }
    }
}
Permission Handling Required
Declare <uses-permission android:name="android.permission.CAMERA" /> in AndroidManifest.xml and request runtime permission. The camera will not work if the Fragment is displayed without permission.
Handling Initialization Failures
If PetnowApiClient.init() or configureDetectionMode() was not called beforehand, the Fragment will not function properly. Verify initialization in your Application class.
Step 5: Additional Features
Observe Detection Progress
override fun onDetectionProgress(progress: Int) {
    // progress: 0~100
    progressBar.progress = progress
}
Observe Detection Status
override fun onDetectionStatus(primaryDetectionStatus: PetnowDetectionStatus) {
    // Reflect each frame's detection status in UI
    statusTextView.text = when (primaryDetectionStatus) {
        PetnowDetectionStatus.Detected -> "Detection successful"
        PetnowDetectionStatus.NoObject -> "Please position your pet in the frame"
        PetnowDetectionStatus.TooClose -> "Please move further away"
        PetnowDetectionStatus.TooFarAway -> "Please move closer"
        PetnowDetectionStatus.TooDark -> "Please move to a brighter area"
        else -> ""
    }
}Front/Rear Camera Switching
val ctx = context ?: return

if (ctx.cameraInfo.isFrontCameraSupported) {
    switchCamera()
} else {
    Toast.makeText(ctx, "This device does not support front camera", Toast.LENGTH_SHORT).show()
}
Restart Detection
You can restart the Detection of the current session from the beginning.
resumeDetection()
    .onSuccess {
        // Detection restart successful
    }
    .onFailure { error ->
        Toast.makeText(context, "Resume failed: ${error.message}", Toast.LENGTH_SHORT).show()
    }
Pause / Resume Detection
You can temporarily pause detection while the camera is running and resume it later. This is useful when displaying a tips screen or instructional dialog.
// Pause detection (preserves progress and captured images)
pauseDetection()

// Resume detection (continues from where it was paused)
resumeDetection()
startDetectionSession / pauseDetection / resumeDetection
startDetectionSession()— Resets progress to 0 and starts a new Detection Session. Use for retake.pauseDetection()— Temporarily pauses detection. Camera preview and progress are preserved.resumeDetection()— Resumes from where it was paused.
// Example: Pause detection while showing a tips dialog
pauseDetection()

AlertDialog.Builder(requireContext())
    .setTitle("Capture Tips")
    .setMessage("Capture the nose from the front in a well-lit area.")
    .setPositiveButton("OK") { _, _ ->
        resumeDetection()
    }
    .setOnCancelListener {
        resumeDetection()
    }
    .show()
Best Practices
Manage API Key Securely
// ❌ Bad: Hardcoded in source
val apiKey = "sk_live_abc123..."

// ✅ Good: Use BuildConfig or local.properties
val apiKey = BuildConfig.PETNOW_API_KEY
Never hardcode API keys in source code. Inject them via local.properties or CI/CD environment variables.
Clean Up Resources
Camera resources are automatically released when the Fragment is destroyed. However, ensure safe cleanup on abnormal exits (e.g., backgrounding) in onDestroyView.
override fun onDestroyView() {
    super.onDestroyView()
    // PetnowCameraFragment handles internal resource cleanup.
    // Clean up any custom resources here if needed.
}
Retry or Close on Failure
If you receive DetectionCaptureResult.Fail and do not retry, simply close the camera screen. The server automatically terminates the session (ABORTED) after approximately 5 minutes.
Troubleshooting
Q. Camera doesn't start
A. Check the following:
- Camera permission (
CAMERA) declared inAndroidManifest.xml - Fragment is shown after runtime permission is granted
PetnowApiClient.init()andconfigureDetectionMode()were called beforehand
Q. Capture keeps failing
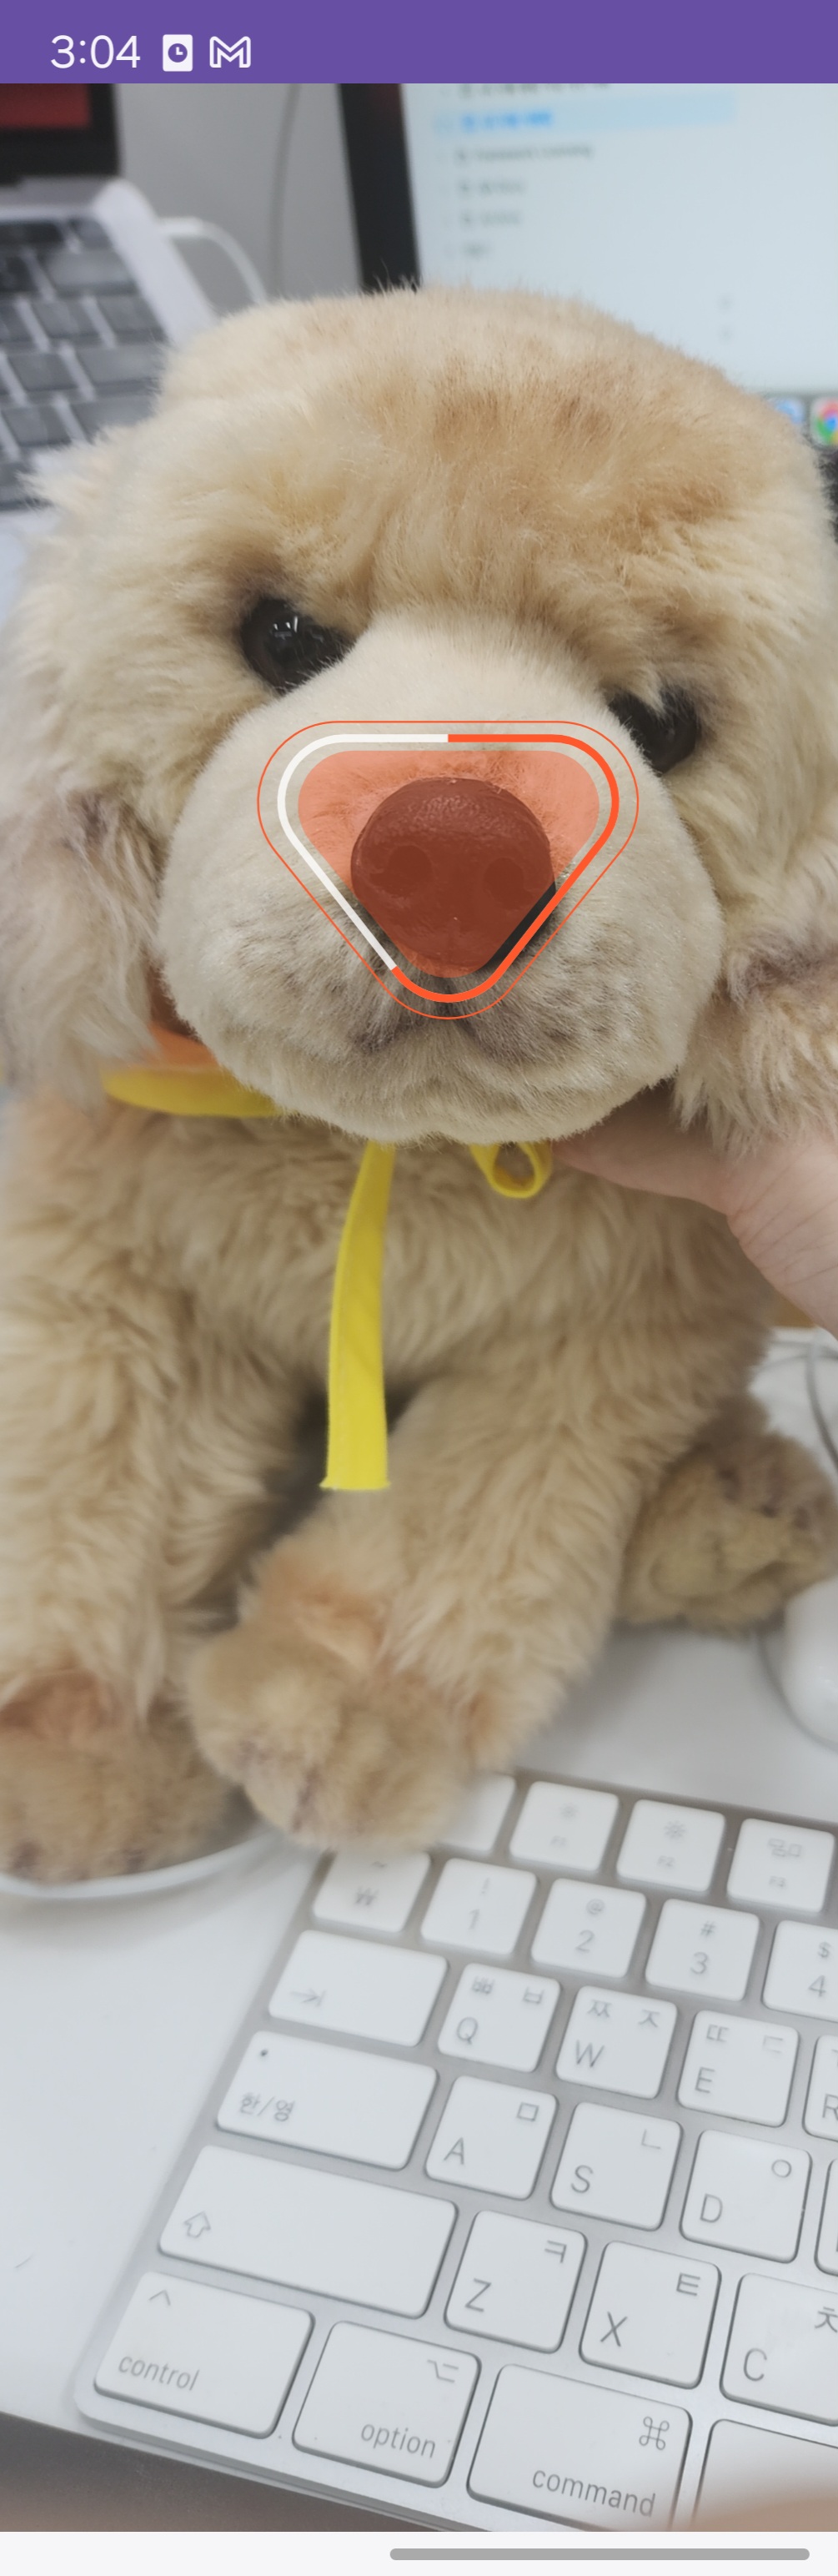
A. Check the capture environment:
- Capture under bright indoor lighting (avoid direct sunlight and shadows)
- Maintain 30-50 cm distance between camera and pet's nose
- Keep the pet still (use treats to guide them)
- Display the status from
onDetectionStatusin your UI to guide the user
Q. Screen freezes after capture failure
A. If you don't handle the UI after receiving DetectionCaptureResult.Fail, the camera screen remains in a frozen state. You must either call resumeDetection() to retry, or close the screen and navigate back. See Step 3 for details.
Q. resumeDetection() fails
A. It will fail if the session has already ended. In the onFailure callback, navigate the user back to the previous screen.
Next Steps
Once you've learned the basic usage, refer to the following documentation:
- Customization - Customize UI overlay
- Sound Guide - Sound playback settings